


Threaded inserts are sleeves or coils installed into wood, plastic, metal, or sheet material to create strong reusable internal threads for machine screws and bolts. The right threaded insert depends on the parent material, load direction, hole size, installation tool, and the failure you need to prevent.
Choose by material first, not by thread size alone, because a wood insert, heat-set brass insert, helical insert, and rivet nut solve different problems. A strong insert installed in the wrong hole can still pull out, spin, crack the part, or cross-thread on the first assembly.
Table of Contents
What Threaded Inserts Do

A threaded insert creates a durable internal thread inside a weaker or thinner parent material. In practice, the insert usually survives the load; the surrounding wood fibers, plastic boss, aluminum threads, or sheet metal often fail first.
Stronger Reusable Threads
Reusable threads matter when a part gets opened, adjusted, repaired, or moved more than once. Machine screws running into metal threads feel smooth and controlled under the fingers, while repeated wood screws often start to feel gritty, loose, and uneven as the fibers tear.
Common examples include furniture legs, cabinet hardware, 3D printed enclosures, electronics covers, access panels, machine guards, jigs, and workbench fixtures. For shop-made fixtures, I’ll often pair inserts with clamping points from a clamp setup so the same holes can handle repeated tightening without chewing up the base.
Stripped Thread Repair
Stripped threads happen when the original material can no longer grip the screw or bolt. Thread inserts restore the original machine-screw size in aluminum, repair loose chair bolts in wood, and give damaged plastic bosses a second life when there’s enough surrounding material left.
The beginner mistake is grabbing a larger screw and forcing it in. That may work once, but it removes more material, shifts the hole center, and can leave no room for a proper insert later.
Load Distribution
Load distribution improves because many inserts spread force through a larger outside diameter, flange, knurl, key, or coarse external thread. This helps resist pull-out, spin-out, vibration loosening, jack-out, and plastic creep.
More contact area doesn’t always mean a better result. In thin wood, small bosses, or narrow aluminum lugs, an oversized insert can split, melt, or weaken the surrounding material faster than a smaller insert with better alignment.
Key Terms
Key terms help you read product listings without guessing. Internal threads accept the screw or bolt; external threads, knurls, barbs, keys, or deformed walls lock the insert into the parent material.
- Threaded insert: broad term for a part that creates internal machine threads.
- Thread inserts: common term for metal thread repair inserts.
- Screw inserts: often used for wood or furniture inserts.
- Threaded bushing for wood: sleeve-like insert with internal machine threads and coarse outside threads.
- Wooden thread inserts: common search wording for threaded inserts used in wood, not inserts made from wood.
- Pilot hole: the drilled or molded hole that controls fit, strength, and alignment.
- Pull-out strength: resistance to being pulled straight out.
- Torque-out resistance: resistance to spinning inside the parent material.
Practical notes from real use: if the insert squeals in hardwood, the pilot hole is often too tight; if melted plastic bulges like a soft doughnut around a heat-set insert, the iron is too hot or pressure is too high. In metal, a tap that suddenly feels crunchy usually means chips are packing in the flutes, so back it out, clean it, and add cutting fluid.
Main Types of Threaded Inserts
Threaded inserts come in wood, plastic, metal repair, press-fit, molded-in, ultrasonic, and rivet-nut styles. Manufacturers such as SPIROL group inserts by installation method and parent material, which is the most reliable way to compare them before buying; see SPIROL threaded inserts.
Wooden Thread Inserts
Wooden thread inserts usually mean metal inserts used in wood, not inserts made from wood. They have coarse outside threads that bite into hardwood, softwood, plywood, MDF, or particleboard and internal threads for machine screws.
Dense hardwood needs more care than pine or poplar because the insert wedges the fibers outward. A tiny chamfer at the hole mouth and a slow hex-key turn prevent the sharp popping sound that often comes right before a split.
Heat-Set Inserts
Heat-set inserts are commonly brass and work by softening plastic so it flows around knurls or barbs. They’re popular for 3D printed PLA, PETG, ABS, ASA, nylon, and polycarbonate parts because the screw threads stay clean and reusable.
The insert should sink under gentle vertical pressure, not be shoved cold into the hole. With PLA, you’ll often notice a faint warm-plastic smell and a glossy ring around the insert when the heat is too high.
Metal Thread Inserts
Metal thread inserts repair or strengthen threads in aluminum, magnesium, castings, steel parts, and fixtures. Helical wire inserts, solid wall inserts, self-tapping inserts, and key-locking inserts all restore internal thread engagement, but they use different drills, taps, and installation tools.
A common trap is using a standard tap where a helical system needs an STI tap. The insert may start, bind, or sit proud, and the repaired thread won’t match the bolt cleanly.
Press-Fit Inserts
Press-fit inserts rely on controlled interference between the insert and hole. They suit production plastics and lower-load assemblies, but they punish sloppy hole tolerances by cracking the boss or loosening after a few screw cycles.
Molded-In Inserts
Molded-in inserts are placed into a mold before plastic flows around them. They can be very strong in production parts because the polymer forms around the insert shape, but they’re rarely useful for one-off repairs.
Ultrasonic Inserts
Ultrasonic inserts use vibration and localized heat to seat inserts in plastic. They’re fast in manufacturing, but the equipment cost and process tuning make them less practical for small workshops than a heat-set tip and temperature-controlled iron.
Rivet Nuts
Rivet nuts, also called rivnuts, nutserts, or blind threaded inserts, create threads in sheet metal or tubing from one side. They deform behind the sheet, so grip range and hole size matter more than raw insert strength.
Insert Type Table
| Insert type | Best material | Installation method | Common use | Main advantage | Main risk |
|---|---|---|---|---|---|
| Wood insert | Wood, MDF, plywood | Screw into pilot hole | Furniture, jigs | Reusable machine threads | Splitting or pull-out |
| Heat-set insert | Plastic, 3D prints | Heat and gentle pressure | Enclosures, prototypes | Good spin resistance | Melted or cracked boss |
| Helical insert | Aluminum, cast metal | Drill, STI tap, mandrel | Stripped thread repair | Restores original thread size | Wrong tap or poor tang removal |
| Key-locking insert | Metal | Drill, tap, stake keys | Heavy-duty repair | High torque-out resistance | Needs wall thickness |
| Press-fit insert | Plastic, composites | Controlled press | Production parts | Fast installation | Hole tolerance sensitivity |
| Rivet nut | Sheet metal, tubing | Mandrel collapse | Panels, frames | Blind-side installation | Spin in oversized holes |
Choose Inserts by Material
Material choice controls the insert style more than the screw size does. Wood needs coarse external bite, plastic needs controlled flow or compression, metal repair needs correct tapping, and sheet metal needs a clamping insert such as a rivet nut.
Threaded Bushing for Wood
A threaded bushing for wood works best when you need a removable machine screw in furniture, cabinetry, speaker boxes, workbenches, or shop jigs. Brass installs smoothly and resists corrosion; zinc-plated steel gives more strength indoors; stainless steel fits damp or outdoor work.
Hardwood needs clearance because oak, maple, and beech can split when the outside thread displaces fibers. Softwood accepts inserts easily, but it pulls out sooner, so use longer external threads or add epoxy in low-load repairs where the fibers are already crushed.
Plastic Inserts
Plastic inserts include heat-set, ultrasonic, press-in, expansion, and molded-in styles. Brass is common because it conducts heat well, machines cleanly, and doesn’t rust in most indoor electronics or maker projects.
Heat ranges are starting points: PLA often seats around 200–230°C, PETG around 230–260°C, ABS and ASA around 240–270°C, and nylon or polycarbonate around 260–300°C. The best setting depends on insert size, tip shape, filament brand, and how fast you move.
3D Printed Parts
3D printed parts usually work best with knurled brass heat-set threaded inserts in M2, M2.5, M3, M4, or M5. M3 is a practical default for small enclosures, robotics brackets, and printed fixtures because screws are easy to source and bosses stay compact.
Design the boss before printing: add a 0.3–0.5 mm lead-in chamfer where space allows, make the hole slightly deeper than the insert, and test hole sizes because printed holes often come out undersized. A boss that looks fine on screen can split along layer lines if the wall is too thin.
Metal Thread Repair
Metal repair usually means helical inserts, solid inserts, self-tapping inserts, or key-locking inserts. Helical inserts are common in aluminum because they restore the original thread size with less material removal than many solid inserts.
Use the correct tap for the insert system. Many helical inserts require STI taps, which are oversized compared with standard taps, and forcing the wrong tooling can ruin the repair hole beyond the next common insert size.
Sheet Metal
Sheet metal usually can’t hold enough thread depth for repeated bolting, so rivet nuts or clinch nuts make more sense. A rivet nut tool collapses the insert behind the sheet, giving you a blind threaded hole in panels, square tubing, cabinets, and automotive brackets.
Grip range matters because the collapsed section must clamp the sheet thickness. If the panel is too thin, the rivnut may wobble; if it’s too thick, the backside won’t form correctly and the insert can spin.
Material Matrix

| Material | Recommended insert | Typical insert material | Tool required | Common failure |
|---|---|---|---|---|
| Hardwood | Coarse external-thread wood insert | Brass, steel, stainless | Drill, hex key, countersink | Splitting |
| Softwood | Long wood screw insert | Zinc-plated steel, brass | Drill, driver | Pull-out |
| MDF / particleboard | Large wood insert with adhesive support | Steel, zinc-plated steel | Drill, epoxy, driver | Crumbling substrate |
| PLA / PETG / ABS | Heat-set brass insert | Brass | Soldering iron, insert tip | Melted boss |
| Nylon / polycarbonate | Heat-set or molded-in insert | Brass, stainless | Heat-set tool or mold process | Creep or stress cracking |
| Aluminum | Helical or key-locking insert | Stainless, carbon steel | Drill, STI tap or tap set | Incorrect tapping |
| Sheet metal | Rivet nut | Steel, aluminum, stainless | Rivet nut tool | Spinning insert |
Load Matrix
| Load type | Better insert choice | Why it works |
|---|---|---|
| Repeated screw removal | Metal threaded insert | Machine threads reduce wear in the parent material |
| Pull-out load | Long, flanged, or coarse external-thread insert | More engagement area spreads axial force |
| Torque load | Knurled, keyed, or externally threaded insert | Locks against rotation |
| Vibration | Key-locking insert, locking screw, threadlocker | Reduces loosening under movement |
| Thin material | Rivet nut or clinch nut | Creates threads where tapping depth is too shallow |
| Plastic boss | Heat-set insert | Plastic flows around knurls during seating |
Skill Matrix
| Skill or tool level | Best insert type | Watch point |
|---|---|---|
| Beginner DIY | Hex-drive threaded inserts for wood | Keep the insert square |
| 3D printing hobbyist | Heat-set brass insert kit | Control heat and pressure |
| Automotive repair | Helical insert kit | Use the correct STI tap |
| Industrial maintenance | Key-locking or solid wall insert | Check wall thickness |
| Sheet metal fabrication | Rivet nut kit | Match grip range |
Sizes, Materials, and Standards
Threaded insert sizes follow the screw thread you plan to use, such as M3, M6, #10-24, or 1/4-20. For thread terminology and measurement basics, the NIST SI units resource is useful when separating metric dimensions from inch fastener systems.
Metric Thread Sizes
Metric sizes for threaded inserts commonly include M2, M2.5, M3, M4, M5, M6, M8, M10, and M12. In 3D printing, M3 and M4 cover many enclosure, hinge, bracket, and small fixture jobs without oversized bosses.
Inch Thread Sizes
Inch sizes commonly include #4-40, #6-32, #8-32, #10-24, #10-32, 1/4-20, 5/16-18, and 3/8-16. Furniture threaded inserts often use 1/4-20, 5/16-18, or 3/8-16 because those bolt sizes handle chair, table, and bed-frame loads well.
Insert Length
Insert length affects thread engagement and pull-out resistance. In metal repair, 1D means the insert length equals the nominal diameter, 1.5D means one and a half times diameter, and 2D means twice the diameter.
Longer isn’t automatic because the part must have enough depth and wall thickness. A long insert in a shallow blind hole can bottom out, crack plastic, split wood, or leave raised threads that stop the mating surface from sitting flat.
Pilot Hole Size
No universal hole size works for all threaded inserts. Pilot hole size depends on the insert outside diameter, external thread or knurl pattern, parent material, hole tolerance, and installation method.
Use the maker’s chart when available, then test in scrap or a printed coupon. Hardwood often needs a slightly larger pilot hole than softwood, 3D printed holes often need compensation for undersizing, and metal repair inserts require matched drill and tap sizes.
Materials and Coatings
Brass inserts resist corrosion, machine cleanly, and heat well, which makes them common for plastic and light wood use. Zinc-plated steel gives affordable strength indoors; stainless steel suits moisture; carbon steel fits heavy repairs when protected from corrosion.
Material pairing matters because stainless screws in stainless inserts can gall under high pressure. A small amount of compatible lubricant or anti-seize can save a repair that would otherwise lock up with a harsh squeak halfway through tightening.
Size Reference Table
| Thread size | System | Common insert use | Typical material |
|---|---|---|---|
| M2 / M2.5 | Metric | Small electronics, sensors | Heat-set brass |
| M3 | Metric | 3D printed enclosures, robotics | Heat-set brass |
| M4 / M5 | Metric | Brackets, larger printed parts | Brass, stainless |
| M6 / M8 | Metric | Furniture, fixtures, light machinery | Steel, brass, stainless |
| M10 / M12 | Metric | Heavy furniture, machinery | Steel, stainless |
| #4-40 / #6-32 | Inch | Small covers, electronics | Brass, stainless |
| #8-32 / #10-24 | Inch | Cabinets, panels, fixtures | Steel, brass |
| 1/4-20 | Inch | Furniture, jigs, workbenches | Zinc-plated steel, brass |
| 5/16-18 / 3/8-16 | Inch | Table legs, bed frames, heavy wood joints | Steel, stainless |
How to Install Threaded Inserts
Good installation matters more than buying the strongest-looking insert. Alignment, hole size, insertion speed, heat control, thread engagement, and screw length decide whether the insert holds cleanly or fails during the first tightening.
Wood Insert Steps
Wood inserts install best when the hole is straight and the entry edge is lightly chamfered. A drill press table helps keep repeat holes square when you’re adding threaded inserts to jigs, furniture parts, or bench accessories.
- Mark the hole center and check edge distance.
- Drill the pilot hole to the insert maker’s recommended diameter and depth.
- Add a countersink or chamfer if the insert has a shoulder or sharp leading thread.
- Drive the insert slowly with a hex key, insert driver, or bolt-and-nut method.
- Stop flush or at the planned depth before the insert compresses the surface.
- Start the machine screw by hand to check thread alignment.
Professional workaround: in brittle hardwood, run a test insert into cutoff stock from the same board, then adjust the pilot hole by 1/64 inch or 0.2–0.3 mm if the fibers crack. A little wax on the outside thread can make the drive feel smooth instead of jerky.
Heat-Set Insert Steps
Heat-set inserts need heat, patience, and vertical pressure. A flat insert tip centers better than a pointed soldering tip because it contacts the insert face evenly instead of skating off to one side.
- Print or drill the hole to the tested diameter.
- Place the insert squarely on the lead-in chamfer.
- Heat the insert with a soldering iron and insert tip.
- Apply light vertical pressure and let the insert melt into the plastic.
- Stop when the top sits flush or slightly below the surface.
- Hold alignment until the plastic cools.
- Install the screw only after the boss feels firm again.
This video shows the basic hand motion and pacing for installing inserts cleanly, which is easier to grasp visually than from a chart alone.
Helical Insert Steps
Helical inserts repair stripped metal threads by creating a new oversize tapped hole that accepts the wire insert. Heli-Coil-style systems commonly use STI taps and installation mandrels, as shown in Heli-Coil thread repair.
- Drill out the damaged thread to the kit’s drill size.
- Tap the hole with the correct STI tap.
- Clean chips from the hole with air, brush, or solvent as suitable.
- Install the insert with the mandrel tool.
- Break off the tang if the insert design requires it.
- Check bolt engagement by hand before applying working torque.
Do not rush the tap. The feel should be steady and cutting, not gritty; back out often to clear chips, especially in blind aluminum holes where packed chips can crack a casting or jam the tap.
Key-Locking Insert Steps
Key-locking inserts add mechanical keys that stake into the parent metal after the insert is screwed into place. They resist rotation better than many wire inserts, but they need more surrounding material and more careful drilling.
- Drill the repair hole to the specified diameter.
- Tap the hole for the insert’s outside thread.
- Screw the insert flush or to the specified depth.
- Drive the locking keys into the parent material.
- Verify that the bolt threads freely without catching.
Use key-locking inserts where vibration or torque-out matters, such as machinery housings and heavily serviced fixtures. Avoid them in thin bosses or narrow lugs where the keys would crowd the edge.
Rivet Nut Steps
Rivet nut installation is closer to setting a blind rivet than tapping a hole. The mandrel pulls the insert body so it collapses behind the sheet and clamps the material between the flange and bulged backside.
- Drill the hole to the rivet nut maker’s specified size.
- Deburr the hole so the flange sits flat.
- Thread the rivet nut onto the mandrel.
- Insert it squarely into the hole.
- Set the tool until the backside collapses within its grip range.
- Remove the tool and test the screw by hand.
Installation Checklist
| Insert job | Check before installing | Check after installing |
|---|---|---|
| Wood insert | Pilot size, edge distance, grain direction | Flush depth, no splitting, screw starts by hand |
| Heat-set insert | Hole test, boss wall, tip temperature | Insert square, no raised melt ring, cooled before loading |
| Helical insert | Correct drill, STI tap, depth | Tang removed if required, bolt threads smoothly |
| Key-locking insert | Wall thickness, tap size, key clearance | Keys fully seated, insert doesn’t turn |
| Rivet nut | Hole size, sheet thickness, grip range | Flange flat, no spin, panel not crushed |
Prevent Common Insert Failures
Most insert failures come from the surrounding material, not the insert itself. Fix the cause—hole size, wall thickness, alignment, load direction, screw torque, or parent material damage—instead of swapping to a bigger insert first.
Pull-Out Failure
Pull-out failure happens when the insert comes straight out under axial load. Common causes include oversized holes, short inserts, weak particleboard, thin printed bosses, shallow engagement, and aggressive screw tightening.
Prevent pull-out with longer inserts, flanged inserts, larger bosses, correct pilot holes, better material around the repair, or epoxy support in damaged wood. In 3D prints, increase boss diameter before increasing screw size.
Spin-Out Failure
Spin-out failure occurs when the insert rotates in the hole as the screw tightens. It often appears as a sudden soft slip after resistance builds, and the screw may keep turning without clamping the parts together.
Stop spin-out by using knurled inserts in plastic, coarse outside threads in wood, key-locking inserts in metal, or the correct grip range for rivet nuts. A torque screwdriver helps on small M2 and M3 assemblies where hand feel can be misleading.
Wood Splitting
Wood splitting comes from a tight pilot hole, low edge distance, angled driving, or dense grain that can’t compress around the insert. The crack often starts at the hole mouth, then follows the grain with a sharp tick you can feel through the driver.
Avoid splits by drilling the correct pilot, adding a chamfer, increasing edge distance, testing scrap, and driving slowly. For repeat fixture holes on a table saw sled or jig, pair inserts with stable stock and reliable layout tools from your table saw accessories.
Plastic Boss Cracking
Plastic boss cracking happens when the hole is too small, the wall is too thin, the insert is pressed cold, or the screw bottoms out under the insert. Layered prints can split cleanly along layer lines when the boss lacks enough material.
Fix boss cracking by adding wall thickness, using a lead-in chamfer, lowering pressure, tuning temperature, and making the hole deeper than the insert. Keep screws shorter than the available thread depth so they clamp the part instead of pushing the insert out.
Cross-Threading
Cross-threading happens when the screw enters at an angle or the thread pitch doesn’t match. It feels rough right away, and if you keep turning, the screw can cut a false path through brass, aluminum, or a soft steel insert.
Start by hand for two or three turns before using a driver. Match metric screws to metric inserts and inch screws to inch inserts, then replace damaged screws instead of blaming the insert for rough engagement.
Failure Mode Diagram
| Failure mode | What it looks like | Likely cause | Best workaround |
|---|---|---|---|
| Pull-out | Insert comes out attached to screw | Hole too large or material too weak | Longer insert, flange, epoxy, larger boss |
| Spin-out | Screw turns but doesn’t clamp | Poor outside grip | Knurls, keys, coarse threads, correct torque |
| Wood splitting | Crack follows grain from hole | Pilot too small or edge too close | Larger pilot, chamfer, more edge distance |
| Boss cracking | Plastic ring splits around insert | Wall too thin or too much heat/pressure | Bigger boss, lower pressure, deeper hole |
| Cross-threading | Screw binds immediately | Wrong pitch or angled start | Start by hand, check pitch, replace screw |
Threaded Inserts vs Alternatives
Threaded inserts overlap with T-nuts, rivet nuts, helical inserts, threaded bushings, and standard nuts. The difference comes down to backside access, material thickness, installation method, and whether the thread must be permanent inside the part.
T-Nuts
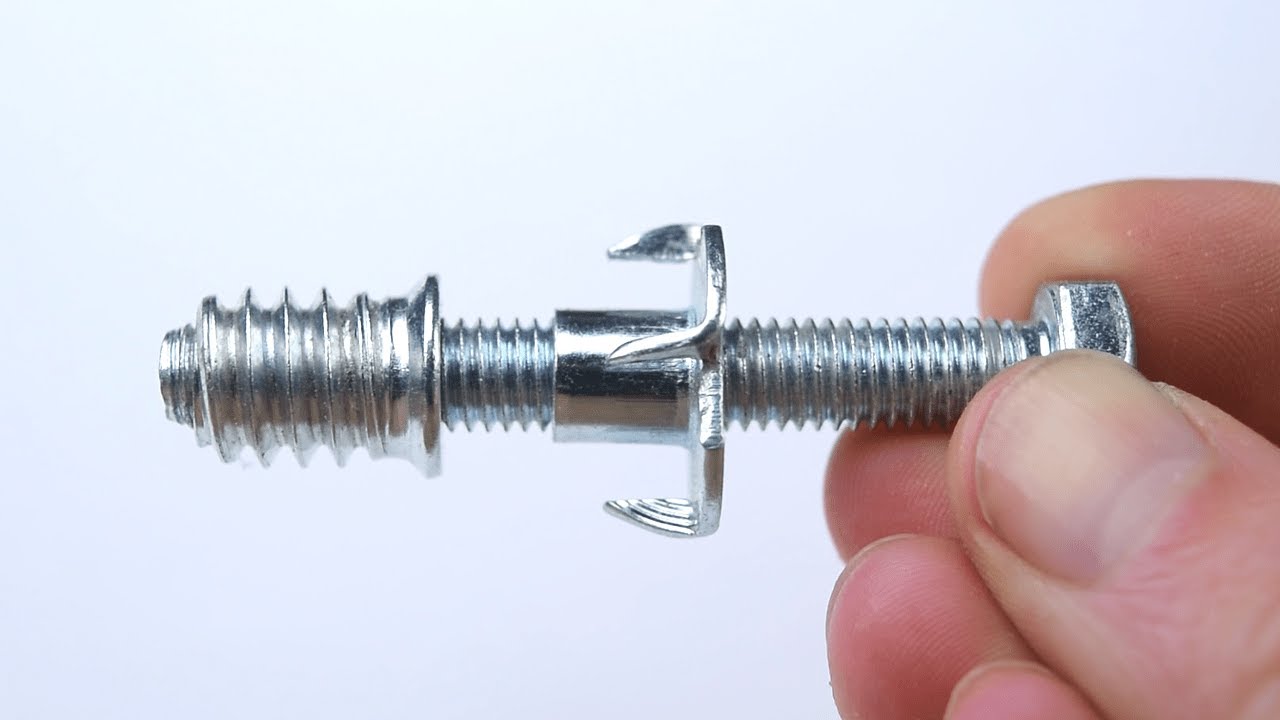
T-nuts install from the backside of wood and use prongs or a flange to resist pull-through. They’re excellent for through-bolted fixtures, but they need backside access and can loosen if the prongs don’t seat well.
Use threaded inserts instead when you need a blind hole, a flush face, or a cleaner furniture repair. Use T-nuts when the bolt passes through and you can hide the flange on the rear face.
Rivet Nuts
Rivet nuts are best for sheet metal, tubing, and enclosures where tapping is impossible or too shallow. They’re threaded inserts in the broad sense, but their collapsing-body installation makes them a separate buying category.
Do not use a wood insert or heat-set insert as a rivet nut substitute. Sheet material needs a fastener that clamps the sheet, not one that relies on thick surrounding material.
Helical Inserts
Helical inserts are a specific type of threaded insert made from coiled wire. They’re mainly used for metal thread repair or reinforcement and are common in aluminum where original threads strip easily.
The key distinction is tooling: helical inserts need a matched drill, STI tap, installation mandrel, and sometimes tang removal. A generic threaded insert kit for wood or plastic won’t repair metal threads correctly.
Threaded Bushings
Threaded bushings can mean the same thing as threaded inserts, especially in wood and machinery listings. The term bushing may also imply a sleeve that helps with spacing, alignment, or wear control, so check the drawing before buying.
Standard Nuts
Standard nuts work well when a bolt passes fully through the part and you can reach both sides. Threaded inserts work better for blind holes, cleaner surfaces, repeated disassembly, and parts where loose nuts would be hard to hold during assembly.
Buying Threaded Insert Kits
Threaded insert kits are convenient for repairs, furniture work, 3D printing, and mixed workshop use, but they aren’t always engineering-rated. For structural, automotive, lifting, or safety-related repairs, use manufacturer-rated inserts with published drill sizes, installation data, and load guidance.
Wood Repair Kits
Wood repair kits help when chair bolts, cabinet hardware, sofa frames, or table legs have stripped out. Look for matching screws, hex-drive inserts, clearly labeled sizes, and enough insert length for the damaged hole.

Wood Insert Repair Kit
- Built for furniture and wood repair jobs
- includes matching screws and inserts for convenient assembly
- hex socket drive supports fast installation
- durable alloy and carbon steel parts for reliable holding
- useful for chairs, cabinets, and sofas
 Buy on Amazon
Check the old fastener before ordering because furniture may mix metric and inch hardware. If the original hole is crumbly particleboard, wick in thin epoxy, let it cure, then drill the pilot hole rather than driving the insert into loose dust.
Wood Insert Assortments
Wood insert assortments are useful when you repair different chairs, cabinets, benches, and tables and don’t know the existing bolt size. A labeled storage box saves time because 1/4-20 and M6 can look close at a glance but won’t thread correctly.

Wood Thread Insert Set
- Ten-size assortment for common furniture repairs
- galvanized steel construction adds durability
- hex wrench included for quick installation
- labeled storage box keeps pieces organized
- suitable for cabinets, chairs, tables, and more
Buy on Amazon
Assortments shine in a repair drawer, but they can hide weak documentation. Measure the insert outside diameter with calipers and make a scrap test hole before committing to a visible furniture part.
Heat-Set Insert Kits
Heat-set insert kits should include the metric sizes you use most, especially M2, M2.5, M3, M4, and M5 for printed parts. Knurled brass bodies resist spin better than smooth sleeves when the plastic flows cleanly around the pattern.

Brass Heat-Set Insert Kit
- Includes a wide range of metric sizes for flexible use
- designed for strong threaded connections in plastic
- knurled brass body helps resist spinning
- ideal for 3D printed parts and repairs
- organized assortment makes selection easy
Buy on Amazon
Measure kit inserts before designing final holes because generic heat-set inserts vary in outside diameter, taper, and length. A 0.2 mm difference can decide whether an M3 insert seats neatly or leaves a melted ridge around the boss.
Complete Heat-Set Bundle
Complete bundles reduce tool-matching confusion by pairing inserts with a soldering iron and heat-set tips. That matters for beginners because a sharp conical tip makes inserts lean, while a flat tip lets the insert settle square and controlled.

Complete Heat-Set Bundle
- Combines a 60W digital soldering iron with insert tips
- 380 piece brass assortment covers many common sizes
- made for plastic parts and 3D printing projects
- heat-set design helps create secure, lasting threads
- all-in-one kit for setup and repairs
Buy on Amazon
A full setup pays off if you print enclosures, brackets, jigs, or prototype parts often. For one repair, a smaller insert kit plus an existing temperature-controlled iron may cost less and take less storage space.
Small Kits vs Bulk
Small kits cost more per insert but often include mixed sizes, screws, storage boxes, hex keys, or heat-set tips. Bulk packs make sense when you standardize on one size, such as M3 heat-set inserts for printed products or 1/4-20 wood inserts for shop fixtures.
Buy bulk carefully because 500 inserts in the wrong outside diameter become clutter fast. For fixture work around a router table, standardizing on one screw size makes replacement hardware and setup blocks easier to manage.
Brand-Name vs Generic
Brand-name inserts usually give better pilot-hole charts, tolerance data, installation notes, and material options. Generic kits can be good for hobby repairs, but they may vary in plating quality, thread finish, insert length, and drive fit.
Use rated parts for machinery, vehicles, load-bearing furniture, or anything that could injure someone if it fails. Use generic assortments for prototypes, low-load covers, cabinet repairs, and test builds where you can inspect the result.
Hidden Tool Costs
Tool costs can exceed the price of the inserts. Wood inserts may need quality drill bits and countersinks; heat-set inserts need tips and temperature control; helical inserts need STI taps and mandrels; rivet nuts need a setting tool.
The smartest buy is the insert system you can install accurately every time. If the kit doesn’t include the right drill, tap, mandrel, heat-set tip, or grip-range chart, budget for those before deciding it’s cheaper.
FAQs
What Are Threaded Inserts Used For?
Threaded inserts are used to create durable, reusable metal threads in materials like wood, plastic, and soft metals. They let you install and remove bolts or machine screws without wearing out the base material. This makes them useful for furniture, jigs, repairs, and DIY projects.
What Size Hole Do I Drill For Threaded Inserts?
You should drill a hole that matches the insert’s recommended pilot size, which is usually listed by the manufacturer. The hole needs to be accurate so the insert fits tightly without splitting the material. If the fit is too loose, the insert may spin or pull out.
Can You Use Threaded Inserts In Wood?
Yes, threaded inserts can be used in wood very effectively. They work best in hardwoods and dense sheet goods, where the threads can grip securely. In soft wood, you may need a larger insert or added adhesive for a stronger hold.
Are Threaded Inserts Stronger Than Screws?
Yes, threaded inserts are often stronger than driving screws directly into wood or plastic. They provide a metal thread that can handle repeated assembly and disassembly much better. The overall strength still depends on the insert type, material, and how well it is installed.
Why Do Threaded Inserts Pull Out?
Threaded inserts pull out when the hole is oversized, the material is too soft, or the insert was not installed fully and straight. Too much torque can also loosen them over time. Using the correct pilot hole and installation method helps prevent this problem.


