


A crosscut sled is a table saw jig that supports a workpiece while guiding it across the blade at a fixed angle, most often 90 degrees. It produces square, repeatable crosscuts with better support and control than a standard miter gauge.
Table of Contents
What Is a Crosscut Sled?
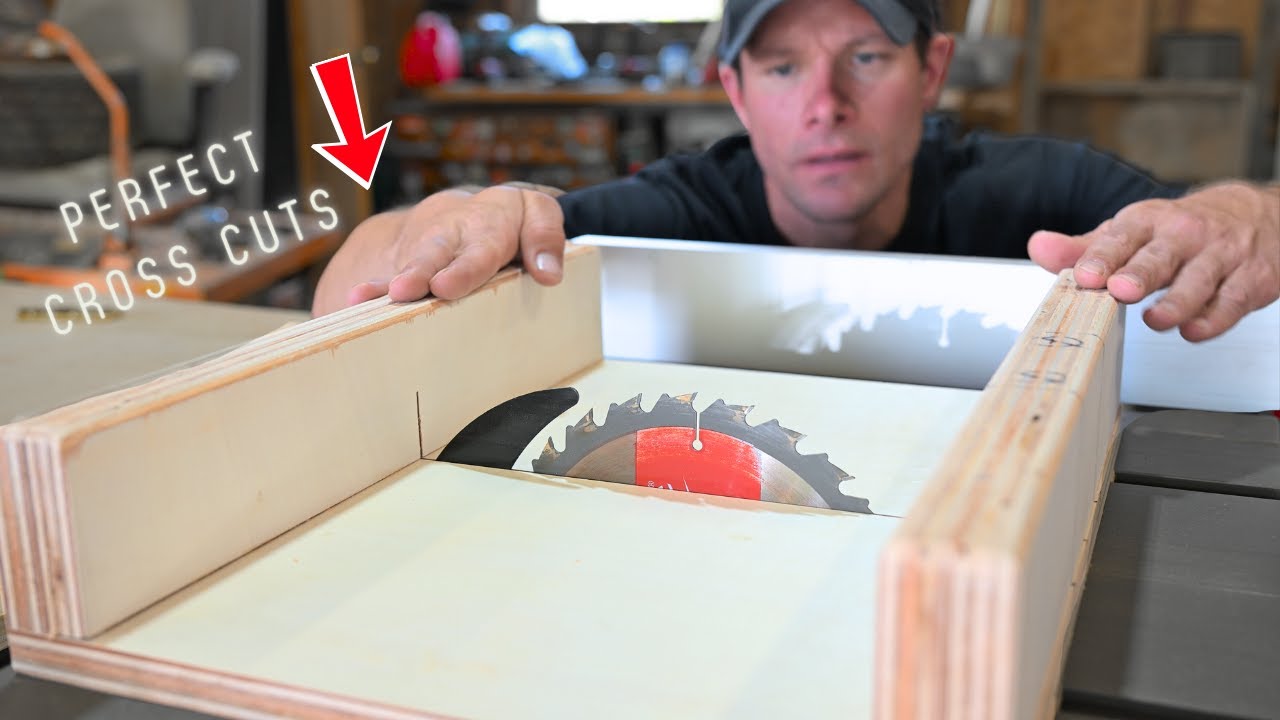
A cross cut sled consists of a flat base, one or two runners, and fences that travel with the workpiece. The saw blade passes through the base, creating a zero-clearance kerf that shows the exact cutting line.
How It Works
The runners fit the table saw’s miter slots and limit movement to a straight path. When you push the sled forward, its rear fence carries the board through the blade while the base supports fibers beside the cut.
This arrangement separates guidance from cutting. The miter slots control the sled’s travel, the rear fence sets the workpiece angle, and the kerf marks where the blade removes material.
Most sleds use the rear fence as the working fence because pressure from the operator pushes the board firmly against it. A tall rear fence also creates room for a blade-exit guard where the teeth emerge behind the workpiece.
Sled vs. Miter Gauge
A miter gauge supports a board along a narrow fence face, while a sled supports it across a broad base. That wider workpiece support matters with panels, short parts, thin strips, and stock that tends to tip near the blade opening.
| Feature | Crosscut sled | Miter gauge |
|---|---|---|
| Workpiece support | Full base support on both sides of the blade | Support mainly from the saw table |
| Repeat cuts | Easy with an attached stop block | Possible with a long auxiliary fence |
| Angle changes | Best at one calibrated angle | Fast adjustment for many angles |
| Capacity | Limited by base size and fence length | Limited by table area and fence stability |
| Storage | Requires wall or rack space | Fits in a drawer or cabinet |
Choose a sled for square crosscuts and repeated lengths. Keep a miter gauge ready for changing angles, long boards, or work that exceeds the sled’s footprint. Other useful table saw accessories can extend either setup without making the sled excessively large.
Why Use a Cross Cut Sled?
A cross cut sled improves support, repeatability, and operator control during table saw crosscuts. Its practical advantage comes from moving the board and reference fence as one unit instead of sliding unsupported stock across the table.
Workpiece Support
The base acts like a moving extension table. A small part that would rock beside a wide throat plate sits flat on the sled, while a panel gets support on both sides of the cut.
That support reduces edge breakout because the base holds the lower fibers close to the blade. On veneered plywood, the difference is easy to feel: a clean edge feels smooth under a fingertip, while an unsupported cut leaves sharp splinters and shallow pits.
Base size creates a trade-off. A large sled carries cabinet panels well but feels heavy at the start of a cut and may tip at the front of a compact saw. Build for the stock you cut often rather than the largest board that could enter the shop.
Accuracy and Repeatability
A square rear fence gives every board the same 90-degree reference. Once calibrated, the sled removes the small angular play found in many factory miter gauges and reduces variation caused by hand placement.
A stop block turns that accurate angle into repeatable length. In practice, ten parts cut against one fixed stop will usually match more closely than ten parts marked and aligned separately, since pencil-line width and eye position no longer affect each cut.
Safer Crosscuts depend on control rather than the jig alone. The sled keeps short stock from twisting into the rear teeth, but it doesn’t replace the blade guard, riving knife, dust control, or safe hand placement described in the OSHA woodworking machinery requirements.
Never trap a cutoff between the blade and rip fence. If you need the rip fence as a length reference, clamp a spacer block to it well before the blade so the workpiece clears that reference before cutting begins.
Key Crosscut Sled Parts
The main crosscut sled parts are the base, runners, front fence, rear fence, blade kerf, and optional stop block. Each part affects accuracy, friction, capacity, or hand safety.
Base and Runners
A base made from 12 to 19 mm plywood or medium-density fiberboard works for many sleds. Thicker material stays flatter but reduces available blade height, which becomes noticeable when cutting thick hardwood on a 10-inch saw.
The runners should slide without side-to-side play. Hardwood runners work well in stable indoor shops, but seasonal swelling can make them bind. Ultra-high-molecular-weight polyethylene runners resist moisture changes and often move with a softer, waxy feel.
Two runners resist rotation better than one, though they require accurately spaced miter slots. A single-runner sled can work on benchtop saws with uneven slots, provided the runner fits closely and the base remains small enough to resist twisting.
Front and Rear Fences
The rear fence sets the cutting angle and needs enough stiffness to remain straight under pressure. Laminating two plywood layers often produces a more stable fence than using one wide solid-wood board.
The front fence mainly holds the two sides of the base together after the blade cuts the kerf. It doesn’t need calibration, but it should clear the blade and remain rigid enough to prevent the base from spreading.
Blade Kerf is the slot cut through the base during setup. It provides a direct visual reference, supports fibers near the teeth, and reveals the blade path, but the zero-clearance benefit fades if you install a wider blade or tilt the arbor.
Stop Block sets repeated part length without repeated measuring. A sliding stop on a T-track offers quick adjustment, while a simple clamp-on wood block costs less and has less play. Place the stop on the rear fence, away from the blade path.
These sled-building supplies cover common runners, clamps, tracks, and measuring accessories.
Crosscut Sled Setup

Crosscut sled setup requires a free-sliding runner, a rear fence square to the blade, and a test cut that confirms alignment. Calibrate the fence only after the base travels smoothly, since runner movement can imitate a fence error.
Check Runner Fit
Disconnect the saw from its electrical supply, place the sled in the slots, and move it through its full travel. A good fit produces a smooth glide with no clicking, diagonal rocking, or visible gap beside the runner.
- Test the fit at the front, center, and rear of each miter slot.
- Sand high spots with a flat block rather than rounding the runner edges.
- Add paste wax to the runner sides and base underside, keeping wax off the fence face.
- Replace runners that require excessive shimming or contain stripped fastener holes.
- Check that screw heads sit below the runner surface.
Beginners often loosen a tight runner by sanding the entire part. That approach can create play at one end. Mark rubbing points with pencil, move the sled several times, and remove material only where the marks burnish or disappear.
Square the Fence
Raise the unplugged saw blade and use a reliable square against the blade plate, not against a carbide tooth. Teeth project sideways and can tilt the square enough to create a visible error across a cabinet door rail.
Fasten one end of the rear fence as a pivot, set the fence close to square, and secure the opposite end temporarily. Place the pivot away from the blade so small adjustments at the far end produce controlled angular changes.
Test the Alignment with the five-cut method. Number the four edges of a square panel, cut a thin strip from each edge in sequence while rotating the panel after every cut, then make a fifth cut from the first edge.
Measure both ends of the fifth strip with calipers. The difference contains four accumulated fence errors, making a small misalignment easier to detect than it would be on a single test cut.
For a calculated correction, divide the end-to-end thickness difference by four. Multiply that result by the distance from the pivot screw to the adjustment point, then divide by the test strip’s measured length. Move the fence by that amount, retighten it, and run another test.
A feeler gauge or measured paper shim helps with tiny corrections. Tapping the fence by eye often overshoots because plywood flexes and fasteners pull the fence slightly as they tighten.
How to Use a Crosscut Sled
To use a crosscut sled, place the workpiece against the rear fence, secure it without crossing the blade path, start the saw, and push the sled through the blade at a steady rate. Stop feeding only after the blade clears the stock.
Position the Workpiece
Brush chips from the base and fence before positioning the board. One hard chip trapped behind the workpiece can shift an end outward and create a tapered cut.
Hold the board’s best reference edge firmly against the rear fence. If the edge bows, joint or straighten it before crosscutting; hand pressure may flatten the bow during one cut but release it differently during the next.
Support long stock with a stand or stable workbench set slightly below the sled surface. A support set too high lifts the sled and changes how the runners contact the miter slots.
Secure the Material
Keep the workpiece flat with hand pressure far from the kerf or use a hold-down clamp. Small parts, round stock, and angled offcuts need mechanical restraint because they can rotate faster than a hand can react.
Choose clamps that lock without placing handles in the blade path. The guide to types of clamps explains the holding differences between toggle, F-style, and quick-action designs.
A compact hold-down clamp is useful for short pieces and repeated production cuts.
Make the Cut by starting with the sled pulled back far enough that the blade doesn’t touch the workpiece. Let the blade reach full speed, push with both hands on designated fence handles, and use a steady feed that doesn’t strain the motor.
The sound offers useful feedback. A clean cut has a steady hiss, while a falling motor pitch, chatter, or sharp knocking suggests excessive feed, a loose part, internal tension in the wood, or a dull blade.
After the blade clears the board, switch off the saw and wait for the blade to stop before retrieving pieces near the kerf. Pulling the sled backward through a moving blade can drag a loose cutoff into the rear teeth.
Create Repeatable Cuts by registering one prepared end against a stop block. Cut the first part, measure it with the same tool used for the project layout, then leave the stop locked for the full batch.
For parts shorter than the distance between the stop and blade, use a long auxiliary fence or a stop extension. Keep the extension rigid; a stop that flexes by 0.5 mm can create visible gaps in face frames and box assemblies.
Cut all matching pieces in one session when practical. Temperature, dust buildup, stop movement, and changing measuring tools can introduce small differences after the setup has been removed and rebuilt.
Accuracy, Maintenance, and Safety

A crosscut sled stays accurate when its fence remains square, its runners stay tight, and its base remains flat. Routine inspection also catches loose hardware, damaged guards, and worn kerf edges before they affect a cut.
Correct Alignment Errors
Check the saw before altering the sled. A blade that isn’t parallel with the miter slots can burn one edge, widen the kerf, and produce misleading square-test results. Follow the saw maker’s alignment procedure before calibrating the rear fence.
If a previously accurate sled starts cutting out of square, inspect runner screws, fence joints, and the base for moisture damage. A permanent twist in the base calls for replacement; forcing a twisted sled flat during calibration hides the fault rather than fixing it.
Small fence errors can be corrected by loosening fasteners at the adjustment end, inserting a measured shim, and repeating the five-cut test. Avoid driving a new screw into nearly the same hole because the point may follow the old hole and pull the fence back.
Maintain Smooth Travel
Vacuum the miter slots and wipe resin from the runners. A gritty runner feels rough through the fence handles and can cause the operator to push harder, creating a sudden surge once the obstruction releases.
Apply a thin coat of paste wax to clean runner surfaces and buff it dry. Wet lubricant attracts sawdust and may form compacted deposits along the slot walls.
Store the sled vertically on supported edges or flat on a dry shelf. Leaning a large base against one narrow corner can introduce a gradual bow, particularly with thin fiberboard.
Protect Hands and Fingers with fixed grip zones marked on the rear fence. Keep both hands outside the blade corridor, never reach over the blade, and add a covered block where the blade exits the rear fence.
Wood dust can irritate the skin and respiratory system, and some species can cause stronger health effects. Use effective extraction and suitable respiratory protection based on the guidance in the NIOSH wood dust information.
Don’t use a crosscut sled for rip cuts. Trapping a long board between two fences restricts sideways relief and can lead to binding or kickback. Use a calibrated table saw fence and the proper guarding arrangement for ripping.
Inspect Before Use by checking runner fit, fence movement, fastener heads, clamps, stops, and the blade-exit guard. Rotate the unplugged blade by hand to confirm that no new screw or accessory enters its path.
Pre-cut check: Clear chips, lock the stop, test the clamp, identify the cutoff side, and rehearse where both hands will finish after the blade passes through.
Crosscut sled operating routine
Practical Notes From Real-World Use: Fine dust often causes more trouble than obvious damage. A sled may feel accurate while empty, then hesitate under a wide panel because packed dust lifts one runner by a fraction of a millimeter.
Dark polishing beside the kerf often signals blade contact with the base rather than normal wear. Check blade alignment and arbor movement before widening the slot, since a wider kerf removes the visual reference and lower-fiber support.
The most useful sled isn’t always the largest one. A medium sled that can hang near the saw gets used often, while an oversized model may stay against the wall because lifting and balancing it feels awkward. Match its width, weight, and capacity to the saw and your common projects.
FAQs
What Is A Crosscut Sled Used For?
A crosscut sled is used to make accurate, safe crosscuts and repeatable cuts on a table saw. It supports the workpiece on both sides of the blade, which helps prevent tear-out and keeps smaller pieces stable. Many woodworkers also use it for miters, dados, and cutting panels to exact length.
Is A Crosscut Sled Better Than A Miter Gauge?
A crosscut sled is usually more accurate and stable than a standard miter gauge for many table saw cuts. Its wide base supports the wood, reduces movement, and can be fitted with stop blocks for repeatable lengths. A miter gauge is still useful for quick cuts and workpieces that are too large for a sled.
How Do You Square A Crosscut Sled Fence?
Square a crosscut sled fence by adjusting it until it is exactly 90 degrees to the saw blade. The five-cut method is a reliable way to test and fine-tune the fence using small test cuts. Once it is square, secure the fence firmly and recheck it after tightening the screws.
Can You Make Angled Cuts With A Crosscut Sled?
Yes, you can make angled cuts with a crosscut sled by attaching an adjustable fence or a dedicated angled jig. A fixed 90-degree sled fence is best for square cuts, but auxiliary fences can be set for common angles such as 45 degrees. Always secure the workpiece to prevent it from shifting during the cut.
How Large Should A Crosscut Sled Be?
A crosscut sled should be large enough to support your typical workpieces without becoming too heavy to handle safely. A common size is about 24 inches wide by 30 inches long, but smaller saws may need a more compact sled. Build it to fit your table saw top, blade clearance, and storage space.


